If you enjoy exciting RV camping road trips and travelling North America looking for great new boondocking and RV resort locations, you should always be prepared for emergencies. That includes RV breakdowns. Depending on your situation, an RV repair can become very expensive. Understanding your RVs systems can help save you money in a breakdown.
Knowing Your RV Will Save You Time and Money
Get to know your RV by asking these important questions. Keep the answers somewhere easy to access because having the answers to these important questions will help you save time and money on RV repair and maintenance.
1) What is a trailer maintenance log?
Keep a simple log stored in your RV. This log records the distance covered, preventative and breakdown maintenance performed, and dates. This will help you plan for maintenance and control costs more effectively.
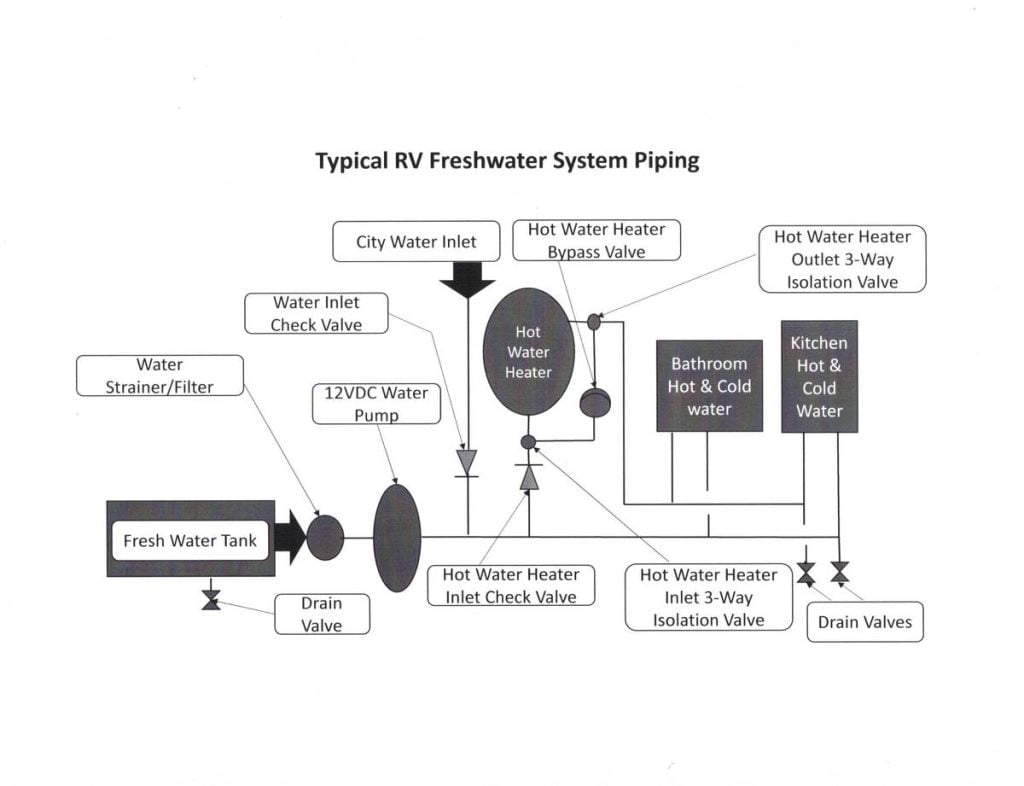
Typical RV Fresh Water System
2) Where are your trailer water system components located?
It’s important to know your RVs water system. If you understand all the components, where they’re located, what signs to look for that, indicate a problem, and how to repair minor issues, you’ll be able to save time and money.
- Water strainer filter: They require replacement regularly, depending on use. They can become blocked if not replaced, and water flow may drop. Know where it is in your RV and how to replace it before heading out on an adventure.
- Water pump: It’s important to understand what they sound like because the sound of a continuously running water pump indicates a system problem. A dry-water pump seal can be temporarily repaired by carefully disassembling and smearing a thin layer of Vaseline on the seals.
- Regularly check for water leaks: A water leak in a trailer will cause expensive damage to the bodywork.
- Water heater bypass: These are installed to assist when winterizing the water system. The water heater is typically 6, 10, or 12 gallons of liquid. If your hot water heater has no bypass, you should consider installing one. It can help you save gallons of antifreeze.
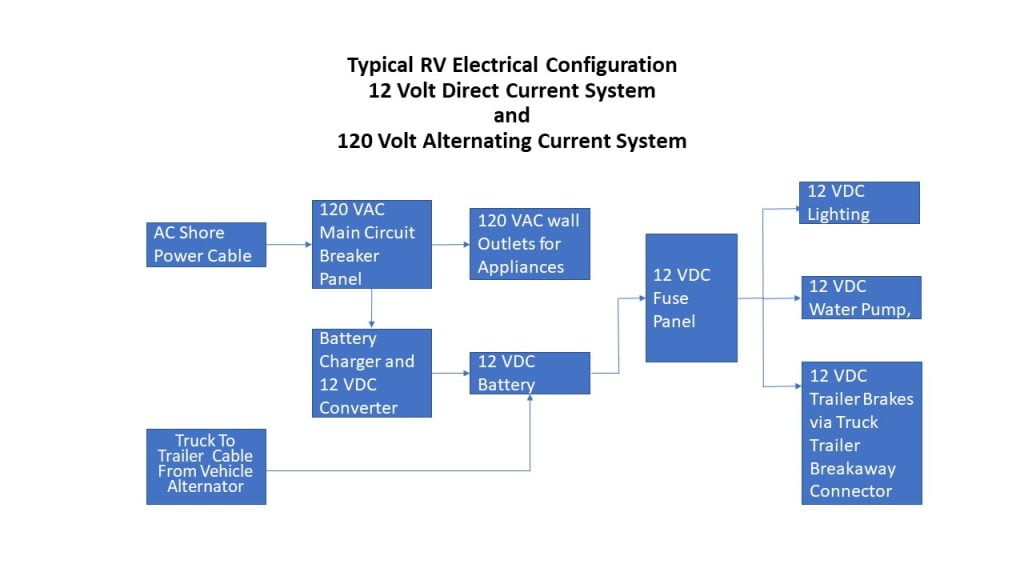
Typical RV Electrical 12 VDC and 120 VAC System
3) When should you check the trailer running, indicator, and brake lights?
Have a second person check the rear lights before you leave the campsite. They can also help by walking behind as you pull off the site to pick up dropped tools and garbage. This check keeps you safe on the road and saves money on lost tools. It also ensures the campsite you’re leaving is clean for the next visitors.
4) What are your trailer and shore power cable amperage ratings?
Shore power is the electrical supply from the pedestal at your campsite. It should be measured with a test metre before connecting. It should measure 120 volts +/- 10%. Alternatively, surge protection devices are available at RV dealerships that use LED displays to inform you if connecting your RV to this outlet is safe. Our friends plugged into a pedestal at a campsite and discovered it was not 120 Vac but 240 VAC. This resulted in damage to their fridge and TV.
A Trailer Electrical Rating is typically 50-amp, 30-amp, or 15-amp.
Electrical adapters are available in most camping stores to plug your trailer into any shore power pedestal. You can draw 50-amps through a 50-amp pedestal circuit breaker, and it will not trip. Your trailer is protected with its circuit breakers. However, if rated at 15 or 30 amps, your shore cable may burn. This can cause a fire in your RV, which is expensive to repair damage and dangerous.
If your trailer has a 50-amp connector and the campsite only has a 30-amp or 15-amp outlet, you could cause the pedestal circuit breaker or the campground circuit breaker to trip.
5) Where is the battery, and how do you check it?
Know where your RV’s battery is and keep the area around it tidy and well-ventilated. Your deep cycle 12-volt battery may lose its liquid level during hot weather or heavy use. This may make holding a charge difficult, and you may need to replace it early. You can check your batteries with a hydrometer and top them up using distilled water.
6) Does your 12-volt DC isolation switch to isolate your battery?
A 12-volt DC isolation switch does not isolate the gas alarms on many trailers. Disconnect the battery at the negative terminal during long-term storage.
7) Where are the 12-volt DC fuses and 120-volt AC circuit breakers located?
Check your fuse and circuit breaker panel when an appliance or a trailer component, such as landing legs, doesn’t work before you call a mechanic. Try and think about what could have caused the issue. The answer may be as simple as the electric kettle was plugged into a different wall outlet or the hair dryer was on in the bedroom while the microwave was on in the kitchen. This will help you avoid unnecessary expenses from mechanics.
8) When were your trailer brakes and wheel bearings last inspected?
This is one of the most important systems because your safety depends on it. I’ve never had a wheel-bearing failure, but I’ve been with people who have – even in new trailers. Bearing failures leave you immobile at the side of the road. Consider carrying a spare set for one axle to give to a service technician or install yourself.
Repacking your wheel bearings is recommended every 20,000 km or 12,000 miles.
To check your wheel bearings, follow these steps.
- Block and lock the trailer wheels on the side you’re not working on.
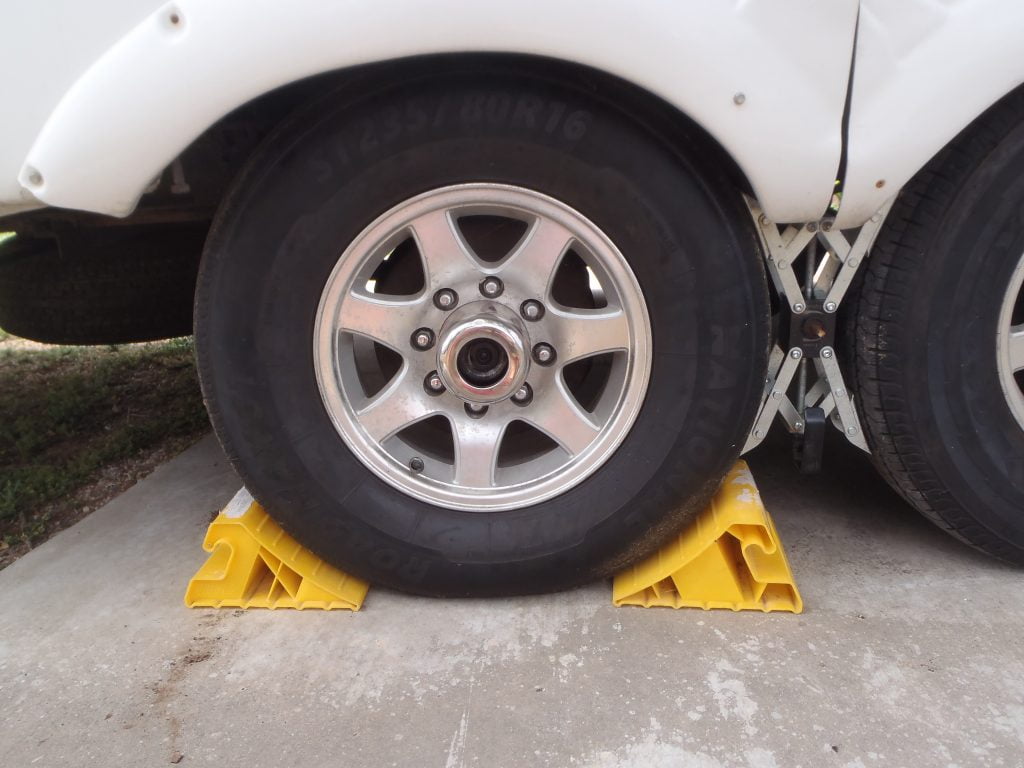
Blocking and Locking the Trailer Wheels
- Using a jack, lift each wheel off the ground for inspection every twelve months.
- Spin the wheel, listen for noise, and get a feel for how a wheel with bearings and brakes in good condition turns. There should be little movement, up-and-down, or from side to side. When in doubt, get an expert’s opinion.
- Some bearings have a grease nipple. This is not a substitute for repacking. But while you can spin the wheel, this is an excellent time to put in about three pumps of high-temperature wheel-bearing grease.
- Spin the wheel between each pump; too much grease may burst a bearing seal, allowing grease onto the brake shoes.

Jacking Up One Wheel at a Time.
Repacking is a skilled job. Unless you know what you’re doing, have an expert repack them.
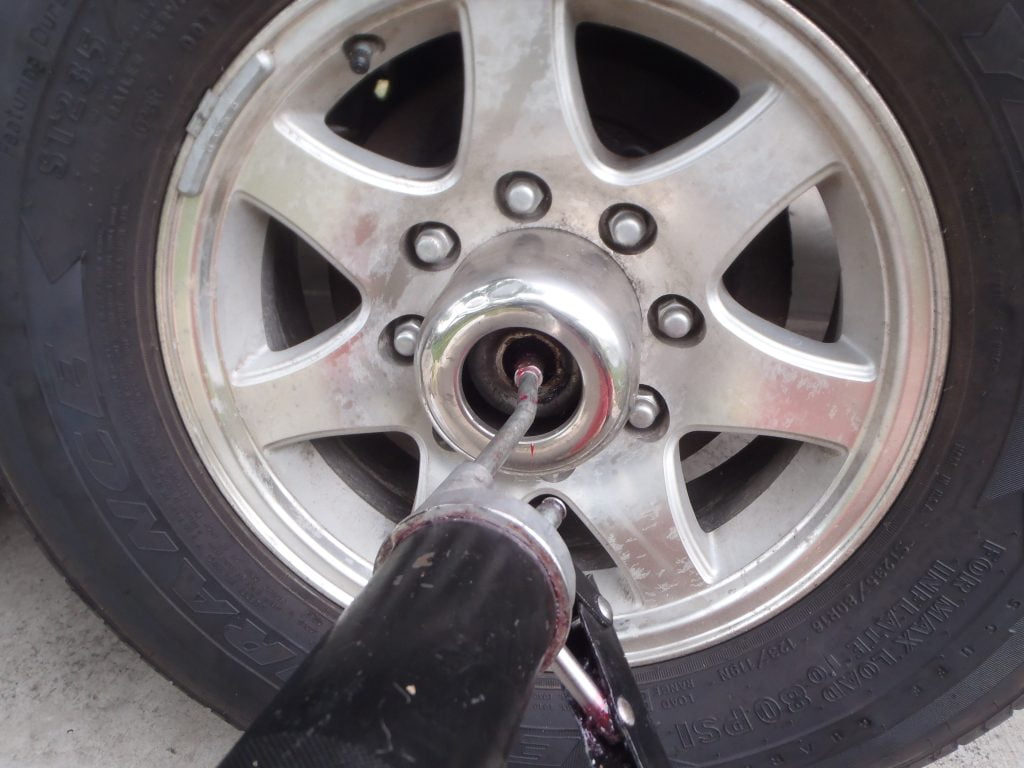
Greasing The Bearings via the Wheel Grease Nipple.
Trailers typically have electrically operated brakes. Electric brakes are activated using an electrical signal from the brake controller in the towing vehicle.
Using the brake controller, you should test the brakes’ effectiveness every time you pull out of a campsite.
Overnight condensation on brake linings makes them ineffective for the first 200 metres. Don’t panic if the brakes don’t work at first. Instead, stop after a couple of hundred metres. Once you’re not moving, use your brake controller to apply the brakes manually. The trailer wheels should not turn when you try to drive forward.
Warning signs that the brakes need an inspection
- Your rig pulls to the left or right when you brake.
- Wheel hubs feel very hot after a short drive. This could also be wheel bearing problems.
- You’ve noticed a decrease in stopping power.
RV electric braking systems require visual inspection.
Coordinate this work with the bearing inspection every 20,000 km or 12,000 miles.
Annually, in conjunction with performing a spin check on the wheel bearings, use the opportunity to listen for brake noise and a functional brake check.
Then, with the trailer connected to the truck, have a second person operating the truck brake. The wheel that you are spinning should stop.
Inspect the brake wiring that can be seen near the axles and the back of the brake plate. I have experienced intermittent loss of trailer brakes due to worn insulation causing an intermittent electrical short circuit on the wire that runs between wheels inside the axle.
Check for worn shoe linings and component wear when the brake drum is removed for bearing packing.
If you see cracking, separation, oil saturation, or a less than 1/16-inch thick lining, replace the brake shoes and the worn or damaged components.
Consider replacing the brake assembly with a pre-assembled backplate. Talk to a supplier. It is cost and time effective.
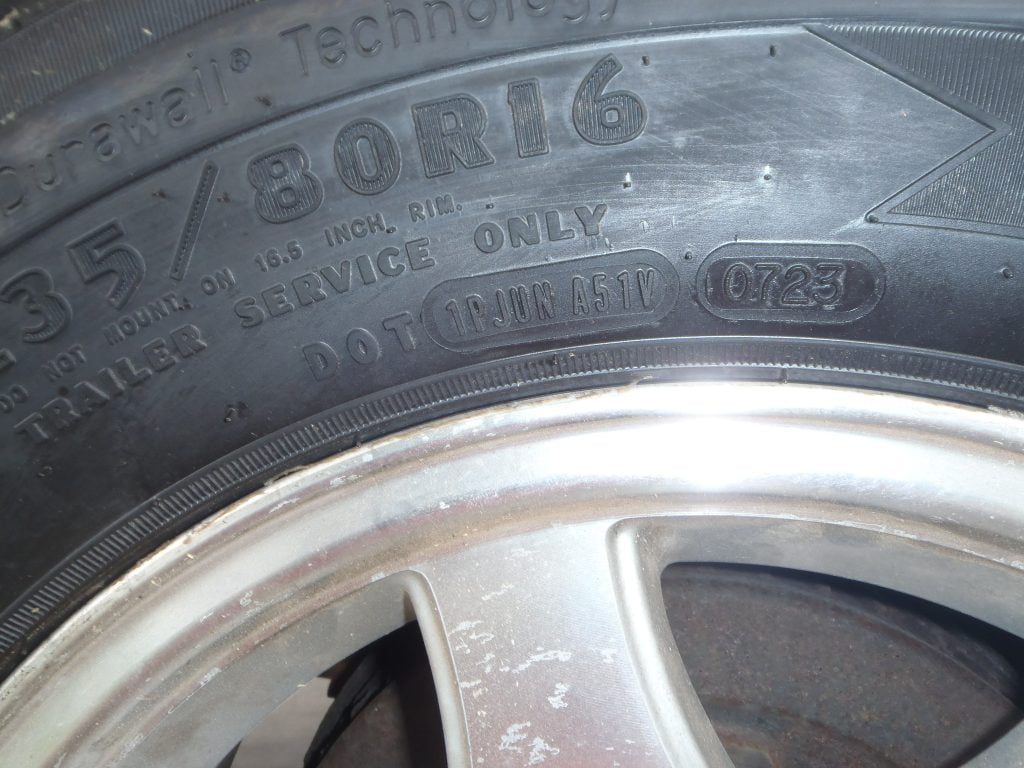
9) How do you inspect the tires for age and tread condition?
Maintain your tires to the trailer manufacturer’s recommended tire pressure. To determine the tire’s manufacture date, look at the DOT code on your tires. The last four numbers are the week and year of manufacture. The first two digits are the week of the year the tire was manufactured, and the last two are the year. For example, my new trailer tire DOT code (0723) tells me that it was made during the seventh week of 2023.
OLYMPUS DIGITAL CAMERA
Storing a trailer is hard on tires; visually, they could look good, but after a few years of use and storage, it is best to be cautious and replace them.
Replace worn or old tires sooner rather than later. A tire failure can cause significant bodywork, underbelly damage and expense. The plastic trim around your trailer wheels, replacement aluminum siding, and repair of the damaged underbelly cost as much as a set of tires.
Understanding your RVs systems
Understanding your RVs systems will give you peace of mind when planning your next camping trip. Completing preventative maintenance will help save you time and money. If you want added peace of mind, consider subscribing to emergency roadside assistance specifically for RVs, like the Explorer RV Club Emergency Roadside Service, exclusively for Explorer RV Club members.
Related Articles
How Lance Campers Build to an Eco-Green Standard
Want an RV but worried about your carbon footprint? The Lance 1475 travel trailer may be right for you!

RV Dishwasher & Laundry Machines – The Pros and Cons
RV dishwashers and laundry machines make life on the road more convenient, but are they worth the cost and potential hassle? Let’s take a look at some of the pros and cons of adding these appliances to your RV. RV Dishwashers Few people enjoy washing dishes by hand,...

6 User-Friendly Apps to Help Stay Connected Over the Holidays
You're definitely not alone if you're heading out of town for the holidays. One survey shows that more than 90 per cent of Canadian snowbirds plan on taking a winter trip — so you'll be in good company! As much fun as it is to hit the road and have an adventure, you...

